No 2 RISING STAR DEMONSTRATOR and placed in the TOP 25 DEMONSTRATORS of the year 2010

No 2 RISING STAR DEMONSTRATOR and placed in the TOP 25 DEMONSTRATORS of the year 2010
Showing posts with label Tutorials. Show all posts

Wednesday, November 5, 2008

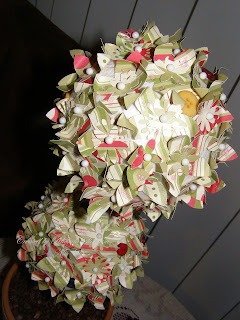
Paper Topiary tree

This delightful little Topiary tree makes a cute table decoration


Products Used:
SU Dashing Designer series paper
SU 5-petal flower punch
SU Spring flower bouquet punch
2 foam balls
Long quilting pins
Kindy glitz
Terracotta pot
Ribbon for bow
Florists oasis
Pebble covering
Assorted buttons
length of dowel

This little project couldn't be easier.
Forcibly push the dowel into the middle of the foam balls (you may need to use a sharp implement to assist you with this...I used my knife sharpener), then remove.

Next, simply punch out your flowers and then arrange them together in pairs or triples and pop them with a pin and stick that into the foam balls...continue doing this until your foam balls are covered (as you go just curl the corners up a little with your finger).

Trim your length of dowel to the size that suits you, when you're happy with the length stick that into the florists oasis in your little terracotta pot.

Now you may want to put a small amount of glue around the holes of the foams balls to get them to stick to the dowel.

Once everything is in position, gently fill in the visible holes with buttons (just glue those on and stick them with a pin, when dry remove the pin)

Dry a length of ribbon around your pot...fill around dowel with pebble or someting suitable to cover the oasis inside the pot.
And there you have it a gorgeous little Topiary paper tree...enjoy

Sunday, August 24, 2008

Fozz Felt Tutorial

Very cute and very simple to do.
The hardest thing here is peeling the backing off the strip.
Step 1: Gathering your supplies
White Fozz felt
Assorted sized cards
Stamp sentiments
Assorted ink pads
Embossing powders
Heat gun

Step 2: Hologram glittler
Press fozz felt into chosen ink pad (I used a metallic impress pigment based pad)
I used Hologram embossing powder to give my fozz a glittery effect..but you can use whatever powder you have.
Sprinkle with hologram embossing powder, tap away excess then heat set....
THIS TECHNIQUE IS ONLY SUITABLE IF YOU ARE USING AN APPROVED HEATING TOOL! the toaster or stove top...is NOT suitable....
Double mat with coordinating cardstock
Stamped sentiment as the finishing touch

Step 3: Chalk ink
I love the look this type of ink gives you
Simply press the fozz felt into your ink pad and allowed to dry.
Next peel off backing strip and adhere to your chosen cardstock.
I then double matted a sentiment stamped image using the same ink, then centred and adhered it to my card.


Step 4: Sponged effect
Too easy........
Adhere your fozz felt directly onto you cardstock, then simply sponge ink from an ink pad over the felt.....allow to dry and embellish as desired.


Have FUN!!

Saturday, August 16, 2008

CARDS FOR ALL OCCASIONS Tutorial

'Shades of' cards for all occasions
I made these up recently and used them for a cybercrop over on scrapshare (I'd link the site..but I don't know how to....very tech challenged that's me).
These cards are really simple and when finished you'll have at least 30 cards ready and at your disposal.


So let's get started shall we.
Step 1
Your Supplies
I used all Creative Memories papers and products for this...so that's what I'll be referring to.
1 full pack of plain PMP (10 sheets with sizing measurements of 12 x 10) I used white
1 Shades of paper pack to coordinate with your plain (again sizing is 12 x 10) I used a Shades of Black
Clear titles
Coordinating flowers and buttons
Craft glue
Tape runner
Trimmer
Matching ink pad (optional)
Step 2
Open up both packs and take 2 plains from your 'shades of' and add them to your plain pack...set the 'shades of' aside for now.
Taking your plain cardstock cut each sheet into 8 x 6...these will become your 4 x 6 cards and you should have 24. You should also have a few small strip left..set these aside.
Now score and fold each card...and set them aside.
Step 3
Follow this guide to cut the plain cardstock from your 'shades of' pack.
(Double click on the template to enlarge it)
Once you've cut them sort them into size groups..fold the larger ones to make 4 x6 cards and put them with your other cards then set them all aside.

Step 4
Follow this guide to cut your patterned papers from your 'Shades of' pack
Group them into sizes and set them aside.


You'll notice you'll have bits of paper in varying sizes and it'll look like a bit of a mountain? Don't stress we'll reduce that pile pretty quickly.
Step 5
This step is really easy...take a card...pick a strip or square of patterned or plain paper (does it need a bit of ink rubbed around the edges to add interest?..do that now or leave it), now adhere it to the card. Next take a small piece different colour or pattern and adhere that onto your card somewhere. yeap! That's the way...Now I want you to pick a button/s or a flower and glue that on with your craft glue...Yay!
Now I mentioned clear titles in the supplies list...I'm using the CM clear titles and they come in a range of fonts and styles...but you'll need to be quick getting them from your CMC because most of them a while supplies last...eek!
Ok...how are you doing, have you made your first card yet... Cool, so now I want you to repeat the process until all your cards are decorated.
You probably have a few strips left over...don't worry sort and store them in a safe place until you need to make another card.

This is how I store my cards....It's a CM mini powersort box that comes with pockets and dividers.....but I've now outgrown that and have to use the larger one......this is great for storing any left over strips as well..... will take a pic soon


And here are some cards I made with other colours from the CM 'shades of' range


Shades of Amber


Shades of Aqua


Shades of Pink

Thursday, August 14, 2008

MAC ATTACK Tutorial

We'll be doing a little embossing and making this cute little card today.

Step 1
Gather your supplies


4" X 6" card...I used CM Brown cardstock
4" x 31/2" piece of white card
4" x 1" piece plus scrap piece of coloured card stock: I used Bazzill Basics...Stonewash
Small piece scrap brown cardstock
Stamp with greeting: For this I used Hero Arts clear design 'A true impression everytime'
Assorted flower punches: Funky flower whale punches and CM micro maker
Clear embossing powder
Versa colour ink pad in Atlantic: it matches the Bazzill Stonewash to a tee.
Versamark watermark stamp pad: I love this stamp pad.
12" Trimmer
Tweezers
Heat Gun.....or use your toaster at a pinch.
Tape runner
Glue pen
Raised adhesive dots.
Step 2
Punch out 1 large, 3 medium, 6 small flowers from your stonewash cardstock, then 1 small and 3 micro flowers from the brown.
Adhere the brown flowers as shown.
Step 3
Press your 4 larger flowers into the versamark (watermark stamp pad), cover with clear embossing powder..shake off any excess then heat set with your heat gun.

A Note on embossing....DO NOT heat your image for too long or you will risk burning the powder which will give it a mottled look...not nice!
Don't you just love the look embossing gives you....
I often use my tweezers to hold whatever I'm embossing, because it can get hot but for these I simply left them on the table...
I like to use a folded piece of copy paper to work on when using embossing powders.
I also use a fine paint brush to dust and tap away any excess powder.
My favourite embossing powder are the basic ones....clear/crystal and occasionally a little hologram...for a bit of Bling.
Step 4
Using your greeting stamp ink it up with your coloured stamp pad, align and stamp it onto your white piece of card towards the bottom. Add your clear embossing powder to this...shake off and heat set.
Step 5
Adhere the small Stonewash strip to the under side of the white card...then adhere this to the brown card.
Step 6
Adhere your flowers with your glue pen and for a more dimensional look I used raised dots for the larger flowers...you"ll also notice I placed my largest flower close to the end of my stamped image (in the top photo)...It looks like part of the stamp....don't you agree.
Viola! your card is finished
Here are a few others I made with this little stamp set....very versatile!


CELEBRATE....
With this card I used Hologram embossing powder.


CELEBRATE....
I'd have like to put a few pumpkins on this card in honour of Halloween..because of the colours but I don't have any!


THANKS SO MUCH....


LOTS OF LOVE....


If you would like to know about any of the products used during this tutorial...drop me an email.

I have 2 spare blue/brown and pink hologram cards...be the first to comment and then email me and I will send them to you.

PS: I had a couple of spare sentiment sets left over from a card class...but these are now gone.


Wednesday, August 13, 2008

PAPER BOX Tutorial


So let's get started.
Step 1


YOUR EQUIPMENT
I used all Creative Memories products for this project
2 sheets of 12 x12 cardstock...I used Creative Memories perfect fit paper for mine.
2 sheets of plain cardstock (this is to make some cards for your little box and is optional)
Tape runner
Photo tape
12” trimmer
Ruler
Multipurpose tool
Pencil


Step 2
Cut 1 sheet of 12 x 12 cardstock to 11½ x 11½ (this will become the lid, so I‘d use the patterned side of your paper)
Cut the other to 11 x 11… set this one aside for now .
Starting with your first sheet fold it over and pinch the edges just a little at the fold…DO NOT score a line all the way along. Now open and fold in the opposite direction and repeat the process..


Step 3
I want you to open it out and mark with a pencil where you have pinched the creases…this makes it easier to complete the next step.


Step 4
Fold your corners into the middle…. and score the edges with your multipurpose tool….gotta love that tool!


Step 5

Now I want you to fold and score the edges in…I don’t have a picture of it..but you need to bring
both sides into the middle and score them…making sure you do not over lap them.


Open out and repeat with the other sides. Cool we’re getting there.Now I want you to fold and score all your edges in the opposite direction to what you just did…This makes the paper more pliable and makes it easier for the next step. I don’t have a pic of that either.


Now open up 2 of the ends…..


Step 6
This bit’s a little tricky, but once you get the hang of it…it’s easy peasy.
Bring 1 side up and fold the edges inwards…it’s hard to describe and hopefully you’ll be able to tell from the pictures


Step 7
Go ahead and put a little tape on the end then fold it in and crease the edges.
Hopefully that makes sense…Now repeat with the other side.


Viola…. a lid YAY!! Now repeat the process with that other sheet of cardstock which will
now become the base
Step 8
YOU KNOW THOSE TRIMMED OFF STRIPS LYING BESIDE YOU?

Got them? 2 will become part of your lid. I ran some photo tape along the length of the thinner strip and adhered it to the wider strip….then placed a little more photo tape on the ends and stuck this to the lid of my box.


Nearly finished… decorate your lid with a little ribbon bow, a sticker or what ever takes your fancy.
So now that you’ve made it what are you going to put in yours??
I discovered they fit those cute little electronic photo frames…this is a gift for a friend.
If you’d like to make cards to fit. I cut 2 sheets of PMP into 3 1/2 x 7” and folded and scored them…then decorated……
Enjoy!

Phew...finally finished...YAY!! but I hope this process gets quicker because I don't fancy spending half the day taking photos and uploading.


and here are a couple of others I've made