No 2 RISING STAR DEMONSTRATOR and placed in the TOP 25 DEMONSTRATORS of the year 2010

No 2 RISING STAR DEMONSTRATOR and placed in the TOP 25 DEMONSTRATORS of the year 2010
Showing posts with label 3 D projects. Show all posts

Wednesday, March 23, 2011

Mother's Day Class- Sneak Peek

This is one of the projects I have on offer leading up to Mother's day
This Framed page would equally suit the birthday girl, wedding, engagement, just about anything really.
If you would like to book an at-home workshop with your friends and make this project please email me.
Or you can attend my next class - being held at the Earthquake Fundraiser on the 2nd April and the 1st May
It's not quite finished..because then that would take away the surprise :)
Cost of this class: $20 and includes all materials to complete the Framed Scrapbook page,please bring own adhesive and 5x7 photo
Class size is strictly limited to 10 - so book in early.

Star Decoration - using Stampin Up!® Snow Swirled

We made these at our Christmas SAS on the weekend


many thanks to my friend Sue-Ellen, who was surfing the net and found the youtube video
http://www.youtube.com/watch?v=alsA_Bn9TnQ

Tuesday, March 15, 2011

I love carrots - especially carrots like these - using Stampin' Up! ® Sizzix Scalloped Circle

How cute and healthy - it is after all a carrot :)

I saw this cute carrot on stampin'connections {SU Demo forum}and just had to re-create it for my class on Saturday? Thank you Theresa Rafter for sharing.

Sunday, March 6, 2011

Cake anyone?

Transferring more goodies from my old blog to here.
We made this cake last year for a friends daughter who was going through a very rough patch with ill health.
We filled the slices with embellishments for when she was well enough to start cardmaking and scrapbooking again.
Now, I'm making 2 new cakes for the Earthquake Fundraiser and if you would like a piece of the pie {cake} all you need to do is come along on the day
you can find out more info here: Demo Website
or find me here on Facebook


Wednesday, March 2, 2011

4 C's Technique Class - April 4th 2011


The Technique we'll be learning this month is A Surprise Slider card..so cute and really really easy.

Check my demonstrator website for more info: http://www.stampinup.net/esuite/home/rhondastatham/

Tuesday, February 15, 2011

February Christmas SAS cards


here are just 4 of the 10 projects we'll be making at the Chrsitmas SAS on the 26th.
Please check my website for more details
http://www.stampinup.net/esuite/home/rhondastatham/

Tuesday, March 24, 2009

Double pouch card holder

What a great gift and fun paper folding technique, using a 12x12 sheet of DSP...so very easy and the best bit...no adhesive necessary!
Learn how to create this great pouch..simply by RSVPing that you will be attending my Catalogue Launch on the 18th April. I will then save you a seat at the demonstration.
For all my interstate readers...I will post instructions in May...


All Bagged up...A cute little album

These I made up for my upcoming hosts...I'm sure they'll like them


Wednesday, November 5, 2008

Paper Topiary tree

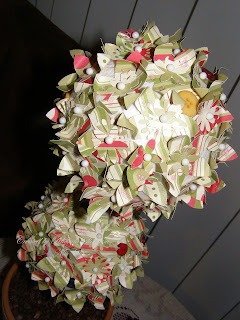
This delightful little Topiary tree makes a cute table decoration


Products Used:
SU Dashing Designer series paper
SU 5-petal flower punch
SU Spring flower bouquet punch
2 foam balls
Long quilting pins
Kindy glitz
Terracotta pot
Ribbon for bow
Florists oasis
Pebble covering
Assorted buttons
length of dowel

This little project couldn't be easier.
Forcibly push the dowel into the middle of the foam balls (you may need to use a sharp implement to assist you with this...I used my knife sharpener), then remove.

Next, simply punch out your flowers and then arrange them together in pairs or triples and pop them with a pin and stick that into the foam balls...continue doing this until your foam balls are covered (as you go just curl the corners up a little with your finger).

Trim your length of dowel to the size that suits you, when you're happy with the length stick that into the florists oasis in your little terracotta pot.

Now you may want to put a small amount of glue around the holes of the foams balls to get them to stick to the dowel.

Once everything is in position, gently fill in the visible holes with buttons (just glue those on and stick them with a pin, when dry remove the pin)

Dry a length of ribbon around your pot...fill around dowel with pebble or someting suitable to cover the oasis inside the pot.
And there you have it a gorgeous little Topiary paper tree...enjoy

Wednesday, October 29, 2008

Paper bows

This is a sneak peak of what we might be making at a papercrafting class PA010050

Aren't they cute

Products used: SU Simply Scrappin' kit - Confetti

calendar class

These are the items we made at our Calendar class last nightPA170061

Paper Topiary tree with lights

I found some cute little battery operated lights...so turn my paper tree into a Topiary...hope you like it and sorry it's a little blurryPA220072

Wednesday, August 13, 2008

PAPER BOX Tutorial


So let's get started.
Step 1


YOUR EQUIPMENT
I used all Creative Memories products for this project
2 sheets of 12 x12 cardstock...I used Creative Memories perfect fit paper for mine.
2 sheets of plain cardstock (this is to make some cards for your little box and is optional)
Tape runner
Photo tape
12” trimmer
Ruler
Multipurpose tool
Pencil


Step 2
Cut 1 sheet of 12 x 12 cardstock to 11½ x 11½ (this will become the lid, so I‘d use the patterned side of your paper)
Cut the other to 11 x 11… set this one aside for now .
Starting with your first sheet fold it over and pinch the edges just a little at the fold…DO NOT score a line all the way along. Now open and fold in the opposite direction and repeat the process..


Step 3
I want you to open it out and mark with a pencil where you have pinched the creases…this makes it easier to complete the next step.


Step 4
Fold your corners into the middle…. and score the edges with your multipurpose tool….gotta love that tool!


Step 5

Now I want you to fold and score the edges in…I don’t have a picture of it..but you need to bring
both sides into the middle and score them…making sure you do not over lap them.


Open out and repeat with the other sides. Cool we’re getting there.Now I want you to fold and score all your edges in the opposite direction to what you just did…This makes the paper more pliable and makes it easier for the next step. I don’t have a pic of that either.


Now open up 2 of the ends…..


Step 6
This bit’s a little tricky, but once you get the hang of it…it’s easy peasy.
Bring 1 side up and fold the edges inwards…it’s hard to describe and hopefully you’ll be able to tell from the pictures


Step 7
Go ahead and put a little tape on the end then fold it in and crease the edges.
Hopefully that makes sense…Now repeat with the other side.


Viola…. a lid YAY!! Now repeat the process with that other sheet of cardstock which will
now become the base
Step 8
YOU KNOW THOSE TRIMMED OFF STRIPS LYING BESIDE YOU?

Got them? 2 will become part of your lid. I ran some photo tape along the length of the thinner strip and adhered it to the wider strip….then placed a little more photo tape on the ends and stuck this to the lid of my box.


Nearly finished… decorate your lid with a little ribbon bow, a sticker or what ever takes your fancy.
So now that you’ve made it what are you going to put in yours??
I discovered they fit those cute little electronic photo frames…this is a gift for a friend.
If you’d like to make cards to fit. I cut 2 sheets of PMP into 3 1/2 x 7” and folded and scored them…then decorated……
Enjoy!

Phew...finally finished...YAY!! but I hope this process gets quicker because I don't fancy spending half the day taking photos and uploading.


and here are a couple of others I've made